
Data Encryption with GunPG
Why am I paranoid about security?
After working with hundreds of legacy websites during my early web development years, I've learnt not to trust any small e-commerce sites written in the last century, nor any website from which I can retrieve password in plain text. Even worse, now I start losing faith in the big boys who fail to guide their users lately: Sony, Twitter, LinkedIn, and Dropbox to name a few, some of them have always vowed to treat security as top priority.
It's not only that that worries me, what about my personal notes stored in the cloud? Someone out there has access to them. Although cloud computing privacy is improving it is nowhere near being regulated or enforced; actually it's quite the opposite. Nevertheless, keeping data only on your physical devices sounds a terrible idea. Hard disks could die on you abruptly; thieves could break in and smash your computer and backups; fire could burn the whole city to the ground. The list can go on and on, putting data in the cloud at least makes our digital possessions immune to the hence mentioned devastating disasters.
Encrypt data with GnuPG
From deliberately changing file extension to zipping sensitive info with password, rudimentary tricks can certainly provide some level of security against novice users. But for experienced techies, these obstacles can easily be lifted with a £500 laptop from Currys within a matter of minutes.
To protect our privacy, We can use Public-key cryptography to encrypt any file, both on our own hard drivers and in the cloud.
A public and private key each have a specific role when encrypting and decrypting documents. A public key may be thought of as an open safe. When a correspondent encrypts a document using a public key, that document is put in the safe, the safe shut, and the combination lock spun several times. The corresponding private key is the combination that can reopen the safe and retrieve the document. In other words, only the person who holds the private key can recover a document encrypted using the associated public key.
The procedure for encrypting and decrypting documents is straightforward with this mental model. If you want to encrypt a message to Alice, you encrypt it using Alice's public key, and she decrypts it with her private key. If Alice wants to send you a message, she encrypts it using your public key, and you decrypt it with your private key. --- The GNU Privacy Handbook
To protect our data in the cloud, we can encrypt our sensitive documents with our own public keys before uploading them. We can then decrypt these documents with our corresponding private keys which can be further protected by a strong password. To peep the encrypted files, someone will have to have both physical access to the private key and the correct password.
Get the Tools Ready
The GNU Privacy Guard (GnuPG) is a superb implementation of OpenPGP standard, which is historically from the famous Pretty Good Privacy (PGP). PGP can be used to sign, encrypt and decrypt documents, directories, and even entire hard disk partitions, as well as to authenticate emails with digital signatures.
GnuPG supports a variety of encryption schemes, paired keys and digital sinatures. It features a convenient key management system and access modules for public key directories. It's a command line tool with features for easy integration with other applications such as Emacs package EasyPG.
GnuPG has quite a few frontends (applications with graphic interfaces) for various operating systems. On Microsoft Windows OS you have Gpg4win; on Mcs OS you have GPGTools for best OS integration. If you are only after a slim command line tool with minimum footprints, or only want to integrate cryptographic options into your own workflow, GnuPG from Homebrew should be more than adequate. Let's get started.
Generate a Keypair
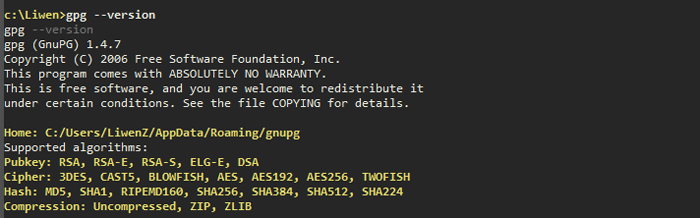
To verify GnuPG installation, issue the command
gpg --version
You should see something similar to this:
To create a new primary keypair:
gpg --gen-key
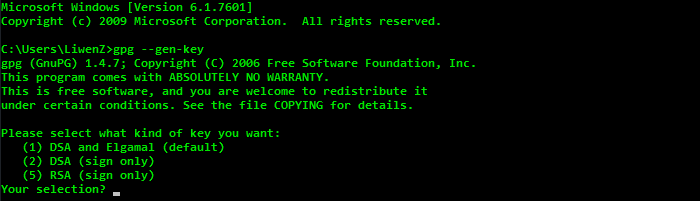
Here the DSA is the primary keypair type which can only be used to make signatures. Elgamal subordinate keypair is the one for message encryption. In most cases the default option is the one you want.
You will then be prompted to set the following attributes for the keypair: size of the key, expiration date, real name, comment and email address. The email address can be used as key specifier later. Some of the info cannot be edited once the keypair is created so type in carefully.
Generate a Revocation Certificate
If you forget your password or your private key is compromised, a revocation certificate can be used to revoke your public key so no one can use it to encrypt messages to you anymore. This may be vital to email communications but it does little with file encryption, as spooks can always decrypt encrypted files if they get hold of your private key and password.
gpg --output revoke.txt --gen-revoke key-specifier
Here key-specifier can be any part of the User ID which identifies your keypair. E.g. the email address used to create the keypair would be a good choice.
You should print out your revocation certificate, take a photo of it, disguise the photo and then upload it to a safe place. Of course don't forget to delete the revoke.txt file permanently from your computer!
Deploy & backup keys
In order to be able to view the encrypted files on all your computers, the keypair needs to be deployed onto every machine. This also means you have multiple backups of your key across different computers. If you ever lose one of the computers, the encrypted data is still accessible.
-
List all keypairs
To see all the keypairs in your operating system, issue the command below. It would list them all and the
uidof each.gpg --list-keys
Export public key
Use the --export option to export the public key. The exported key file will be in binary format by default.
gpg --output public-key.pk --export key-identifier
# Use the email address you used to create the key as key-identifier
If you need to send the key though email or copy it to clipboard, add the --armor option to export it in plain ASCII text.
gpg --output public-key.txt --export --armor key-identifier
-
Export private key
Use the
--export-secret-keyoption to export any private keys. As with public keys, use option--armorto export in plain text. Actually any output from GnuGP can be decorated with--armor. E.g. we can encrypt a binary file such as picture and get an encrypted plain ASCII text output. For more information, ask for help from our good old friendman.gpg --output private-key.pk --export-secret-key --armor key-identifier -
Deploy keypair onto other computers
Copy the exported private key (binary or plain text) onto the destination computer; make sure the new machine has GunPG installed. To import a key, use the
--importoption.gpg --import private-key.pkIssue command
gpg --list-keysto confirm that the keypair has been successfully imported.The corresponding public key will be available on the new machine once its private key is imported. You can import someone's public key without knowing their private key.
-
Verify the imported keys
All the imported public keys must be validated by verifying the keys' fingerprints and then signing them. However if the corresponding private keys have also been imported then you only need to set the trust level.
gpg --edit-key key-identifierThe above command will list the details of the key and also put you into an interactive editing mode. Type in
trustto set the trust level, if you truly trust yourself then set the trust level to ultimate. Issuequitto quit the interactive mode.Now everything is setup and you are ready to hide all your secrets!
Encrypt & decrypt documents
The --encrypt option can be used to encrypt a document.
gpg --output secret.jpg.gpg --encrypt  \
--recipient john@smith.com secret.jpg
Here we encrypted secret.jpg with John's public key (assume john@smith.com is the associated email address for John's keypair). The output would be secret.jpg.gpg which can only be decrypted by John's private key. The added bonus is that if we need to communicate the file though email or other network protocols, we can use the previously mentined --armor option to output the file as secret.jpg.txt so our picture will look like this:
-----BEGIN PGP MESSAGE----- Version:
GnuPG v1.4.7

hQIOAxdwc3QWykEfEAf9E9N87ZPXrOVGyo02ia3lRbuW9vLqvMKtjrAhlRXb7T1n
ZwtXnR5sL7/i6eoza4IgoEwUWWL5Tj32qSRsVzTJYI0gvLyTIT21VjLCdwHiOwh/
9+usSejFkH39nutPtZ4DV32hNjYWa9vlQaKD5um/jT+Ac18UlIR/d5/BO0CCMvf4
H1H+qCgR8BrixE7It0xtRujv/AYRr+4QVThV2vB9xYlxwvDZVXM2kXrI17Y6l3PD
R4bfXAOiQbTYgtgPvMcsZqCkBxDYARRUP8JkupGB5LNALbiaLoCwHjbdisShbmMO
9fYdH4FgW5AgLViRZIM/E95W/FhmZBb0WHmOIFbDpwf+PCVAIg3ISgJbpQFwOMbQ
LpilsUj4pGlUZ45Qm2pq/m1D4uQuETKhGqEP+C29+ndPKrs5/Wc5AhMfnS3mWiDy
zxEyvaMiHeQB7C8SZ3WoEVOFO0fmVxd6X+7EG+PxJ0+SePV0c7WGfg8p2xuEEq7Y
bdzJGccbisn+RDN5TlFVUgZ4tQ3//hMZDhurLRmgP3bFdAgmdPvJZnNv4BGC2sJV
Zzt8tODrKlXqgrwVdSRsXw8trtW0cdiYBcHGCZ8OkM8Q6N2ClXDlY61sHV2KOuyL
a57AnoEwLxnltvXT+KzYUruG5pp3JqeBcRoNkdm9zPmqjUeIuNJ4nb5gpsVA9QzG
bXF3T14Te+KRC3UttP5NbdZ8H+Mq2vjo98FyKdpBSTr5Qs2HTybxZ4ZeZN6g6w4y
11GTIzkOESr0zydnThyLDn7JMs6yhAy6A5Jv59MMLFlVuvTOY01aNrQPJpW6nZG+
fbNbPkvzrEH3TK1Ehw==
=1PP1
-----END PGP MESSAGE-----
To decrypt a message use --decrypt:
gpg --output secret.jpg --decrypt secret.jpg.gpg
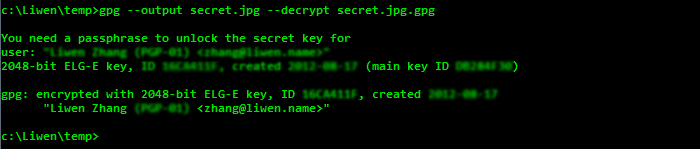
You will be prompted to enter the password for your private key.
What's next?
This open note focuses on the basic usage of GnuPG commands to give readers an insight of PGP encryption. In reality, if you are not a savvy shell user, it is not practical to encrypt/decrypt and manage a large amount of files in this way. Most frontends provide more user-friendly Graphic User Interface (GUI) as well as additional bells and whistles to simplify the encryption/decryption process.